 CARLOS DIEGO C. P.
Windows Authentication with Amazon RDS for SQL Server · Part 2 of 3
Using Windows Authentication with an Amazon RDS for SQL Server DB Instance (Part 2/3)
In this post, we will talk about how to set up Windows Authentication for SQL Server DB instances.
Keywords
In this post, we will talk about how to set up Windows Authentication for SQL Server DB instances.
This post was supported and reviewed by the Valcann team (www.valcann.com.br).

AWS Directory Service for Microsoft Active Directory
Use AWS Directory Service for Microsoft Active Directory, also called AWS Managed Microsoft AD, to set up Windows Authentication for a SQL Server DB instance. To set up Windows Authentication, perform the following steps.
Step 1: Create a directory using AWS Directory Service for Microsoft Active Directory
AWS Directory Service creates a fully managed Microsoft Active Directory in the AWS Cloud. When you create an AWS Managed Microsoft AD directory, AWS Directory Service creates two domain controllers and Domain Name Service (DNS) servers on your behalf. The directory servers are created in two subnets in two different Availability Zones within a VPC. This redundancy helps ensure that your directory remains accessible even if a failure occurs.
When you create an AWS Managed Microsoft AD directory, AWS Directory Service performs the following tasks on your behalf:
- Sets up a Microsoft Active Directory within the VPC.
- Creates a directory administrator account with the user name Admin and the specified password. You use this account to manage your directory.
- Creates a security group for the directory controllers.
When you launch AWS Directory Service for Microsoft Active Directory, AWS creates an Organizational Unit (OU) that contains all of your directory’s objects. This OU, which has the NetBIOS name you typed when you created your directory, is located in the domain root. The domain root is owned and managed by AWS.
The admin account that was created with your AWS Managed Microsoft AD directory has permissions for the most common administrative activities for your OU:
- Create, update or delete users, groups and computers.
- Add resources to your domain, such as file or print servers, and then assign permissions for those resources to users and groups in your OU.
- Create additional OUs and containers.
- Delegate authority.
- Create and link group policies.
- Restore deleted objects from the Active Directory Recycle Bin.
- Run AD and DNS Windows PowerShell modules on the Active Directory Web Service.
The admin account also has rights to perform the following domain-wide activities:
- Manage DNS configurations (add, remove or update records, zones and forwarders).
- View DNS event logs.
- View security event logs.
To create a directory with AWS Managed Microsoft AD
- In the AWS Directory Service console, choose Directories and then choose Set up directory.
- Choose AWS Managed Microsoft AD . This is currently the only option supported for use with Amazon RDS.
- Choose Next.
- On the Enter directory information page, provide the following information:
- Edition
Choose the edition that meets your requirements.
- **Directory DNS name
**The fully qualified name for the directory, such as corp.example.com. Names longer than 47 characters are not supported by SQL Server.
- **Directory NetBIOS name
**An optional short name for the directory, such as CORP.
- **Directory description
**An optional description for the directory.
- **Admin password
**The password for the directory administrator. The directory creation process creates an administrator account with the user name Admin and this password. The directory administrator password can’t include the word admin. The password is case-sensitive and must be 8–64 characters long. It must also contain at least one character from three of the following four categories: _- Lowercase letters (az)
- Uppercase letters (AZ)
- Numbers (0–9)
- Non-alphanumeric characters (~! @ # $% ^ & * - + = `| \ () { } [] :;” ‘<>,.? /)
- **Confirm password
**Retype the administrator password.
- Choose Next.
- On the Choose VPC and subnets page, provide the following information:
- VPC
Choose the VPC for the directory.
- Subnets
Choose the subnets for the directory servers. The two subnets must be in different Availability Zones.
- Choose Next.
Review the directory information. If changes are needed, choose Previous. When the information is correct, choose Create directory.
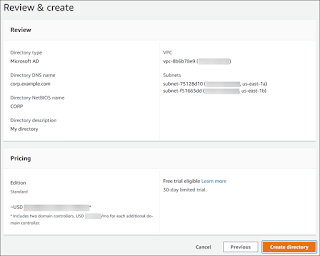
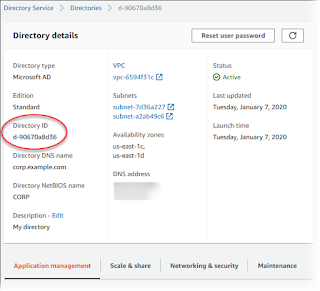
It takes several minutes for the directory to be created. When it has been successfully created, the Status value changes to Active .
To see information about your directory, choose the directory ID in the directory listing. Make a note of the Directory ID . You need this value when you create or modify your SQL Server DB instance.
Step 2: Create the IAM role for use by Amazon RDS
If you use the console to create your SQL Server DB instance, you can skip this step. If you use the CLI or the RDS API to create your SQL Server DB instance, you must create an IAM role that uses the AmazonRDSDirectoryServiceAccess managed IAM policy. This role allows Amazon RDS to make calls to AWS Directory Service for you.
If you are using a custom policy for joining a domain, instead of the AWS-managed AmazonRDSDirectoryServiceAccess policy, make sure that you allow the ds:GetAuthorizedApplicationDetails action. This requirement is effective starting July 2019, due to a change in the AWS Directory Service API.
The following IAM policy, AmazonRDSDirectoryServiceAccess, provides access to AWS Directory Service.
{
 “Version”: “2012–10–17”,
 “Statement”: [
  {
  “Action”: [
     “ds:DescribeDirectories”,
     “ds:AuthorizeApplication”,
     “ds:UnauthorizeApplication”,
     “ds:GetAuthorizedApplicationDetails”
  ],
     “Effect”: “Allow”,
     “Resource”: “*”
  }
 ]
}
Create an IAM role using this policy.
Step 3: Create and configure users and groups
You can create users and groups with the Active Directory Users and Computers tool. This tool is one of the Active Directory Domain Services and Active Directory Lightweight Directory Services tools. Users represent individual people or entities that have access to your directory. Groups are very useful for granting or denying privileges to groups of users, rather than having to apply those privileges to each individual user.
To create users and groups in an AWS Directory Service directory, you must be connected to a Windows EC2 instance that is a member of the AWS Directory Service directory. You must also be logged in as a user that has privileges to create users and groups.
Step 4: Enable cross-VPC traffic between the directory and the DB instance
If you plan to place the directory and the DB instance in the same VPC, skip this step and move on to Step 5: Create or modify a SQL Server DB instance.
If you plan to place the directory and the DB instance in different VPCs, configure cross-VPC traffic using VPC peering or AWS Transit Gateway.
The following procedure enables traffic between VPCs using VPC peering.
To enable cross-VPC traffic using VPC peering
Set up appropriate VPC routing rules to ensure that network traffic can flow both ways.
Make sure that the DB instance’s security group can receive inbound traffic from the directory’s security group.
Make sure that there is no network access control list (ACL) rule blocking traffic.
If a different AWS account owns the directory, you must share the directory.
To share the directory between AWS accounts
Start sharing the directory with the AWS account that the DB instance will be created in.
Sign in to the AWS Directory Service console using the DB instance’s account, and make sure the domain has the SHARED status before proceeding.
While signed in to the AWS Directory Service console using the DB instance’s account, note the Directory ID value. Use this directory ID to join the DB instance to the domain.
In the next post, we will wrap up the process of setting up Windows Authentication for SQL Server DB instances.
See you then!
Comments
Every comment is moderated before it appears here. Nothing is published automatically.
Loading…