 CARLOS DIEGO C. P.
Technical Post · Amazon Web Services
Implementing a Customer Profiling Framework in a Multi-Tenant Environment on Amazon EKS
In multi-tenant environments, multiple applications or services belonging to different customers (or “tenants”) share the same…
Keywords
In multi-tenant environments, multiple applications or services belonging to different customers (or “tenants”) share the same underlying infrastructure. The big challenge here is making sure each tenant gets a personalized, optimized experience without compromising security, performance or allocated resources. It's also crucial to monitor and manage each tenant's behavior to identify usage patterns, detect anomalies and adjust resources as needed. This need leads to profiling techniques, which aim to collect, analyze and act on usage data specific to each tenant.
The problem stems from the complexity of managing multiple tenants in a shared environment. In Kubernetes, each tenant usually has its own containers, services and volumes, all running on a single cluster infrastructure. Without an effective profiling strategy, it can be hard to:
- Identify each tenant's specific behavior: Understand how each tenant uses resources, what its specific demands are and how it behaves under different loads.
- Manage resources efficiently: Make sure no tenant monopolizes the cluster's resources and hurts everyone else's performance.
- Maintain security and compliance: Monitor data access and usage to make sure security and compliance policies are respected.
The answer to these challenges is a customer profiling system in which each tenant is monitored and analyzed separately. In the Kubernetes context, this can be achieved through:
- Separate namespaces for each tenant: Namespaces let you isolate each tenant's resources and data, enabling granular management.
- ConfigMaps and Secrets: ConfigMaps can store configuration data specific to each tenant, while Secrets keep sensitive information safe.
- Roles and Bindings: Define specific permissions for each tenant using roles and bindings, so each one can access only the resources meant for it.
- Pod Monitoring and Logging: Deploy dedicated pods for each tenant, equipped with monitoring and logging tools that collect detailed usage and performance data.
- Automated Alerts and Actions: Set up alerts based on usage metrics, enabling automated actions such as scaling resources or applying temporary restrictions when needed.
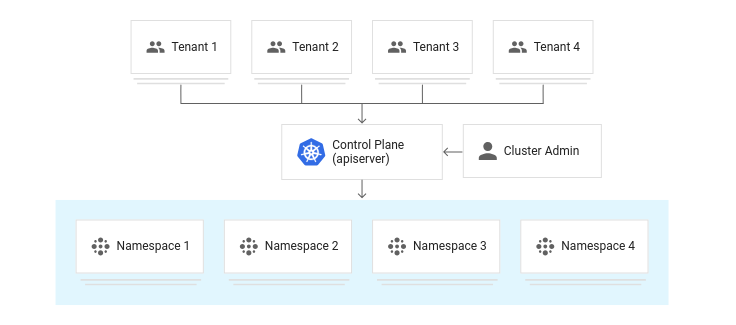
Adopting a profiling strategy in multi-tenant environments brings several benefits:
- Resource Optimization: By better understanding each tenant's behavior, you can allocate resources more efficiently, avoiding waste and making sure everyone gets the performance they need.
- Better User Experience: Profiling lets you dynamically tune the experience for each tenant, delivering a more responsive, personalized service.
- Stronger Security and Compliance: By closely monitoring resource usage and access, you can quickly spot attempted security breaches or non-compliance with internal or external policies.
- Scalability: With an efficient profiling system, the multi-tenant environment can scale with more confidence, knowing each new tenant will be onboarded in a controlled, monitored way.
- Lower Operating Costs: By avoiding unnecessary overhead and ensuring efficient resource allocation, the operating costs of the Kubernetes environment are optimized.
Profiling in multi-tenant Kubernetes environments isn't just a best practice; it's a necessity to make sure compartmentalized infrastructure runs securely, efficiently and at scale, delivering a quality experience to every tenant involved.
How do you implement it?
Implementing a customer profiling framework in a multi-tenant environment with Amazon EKS (Elastic Kubernetes Service) and Terraform involves several steps, from setting up the Kubernetes cluster to creating the resources needed to support profiling. Below is a detailed tutorial for setting up this infrastructure.
1. Prerequisites
- An AWS account set up
- AWS CLI configured
- Terraform installed
- Kubectl installed
2. Configure the Terraform Backend
First, let's configure the Terraform backend to store Terraform state remotely in S3 and use DynamoDB for locking:
# main.tf
terraform {
 backend “s3” {
 bucket = “seu-terraform-state-bucket”
 key = “eks/profiling-clients/terraform.tfstate”
 region = “us-east-1”
 }
}

provider "aws" {
 region = "us-east-1"
}
3. Create the VPC and Subnets
Let's create the network infrastructure EKS needs:
# vpc.tf
resource “aws_vpc” “eks_vpc” {
 cidr_block = “10.0.0.0/16”
}

resource "aws_subnet" "eks_subnet" {
 count = 2
 vpc_id = aws_vpc.eks_vpc.id
 cidr_block = cidrsubnet(aws_vpc.eks_vpc.cidr_block, 8, count.index)
 availability_zone = element(["us-east-1a", "us-east-1b"], count.index)
 map_public_ip_on_launch = true
}

resource "aws_internet_gateway" "eks_igw" {
 vpc_id = aws_vpc.eks_vpc.id
}

resource "aws_route_table" "eks_route_table" {
 vpc_id = aws_vpc.eks_vpc.id
 route {
   cidr_block = "0.0.0.0/0"
   gateway_id = aws_internet_gateway.eks_igw.id
   }
}

resource "aws_route_table_association" "eks_route_table_association" {
 count = length(aws_subnet.eks_subnet)
 subnet_id = element(aws_subnet.eks_subnet.*.id, count.index)
 route_table_id = aws_route_table.eks_route_table.id
}
4. Create the EKS Cluster
Now let's create the EKS cluster:
# eks_cluster.tf
resource “aws_eks_cluster” “eks_cluster” {
 name = “profiling-clients-cluster”
 role_arn = aws_iam_role.eks_role.arn

vpc_config {
 subnet_ids = aws_subnet.eks_subnet.*.id
 }

depends_on = [aws_iam_role_policy_attachment.eks_policy]
}

resource "aws_iam_role" "eks_role" {
 name = "eks-cluster-role"
 assume_role_policy = jsonencode({
   Version = "2012–10–17"
   Statement = [{
   Action = "sts:AssumeRole"
   Effect = "Allow"
   Principal = {
   Service = "eks.amazonaws.com"
   }
   }]
   })
}

resource "aws_iam_role_policy_attachment" "eks_policy" {
 role = aws_iam_role.eks_role.name
 policy_arn = "arn:aws:iam::aws:policy/AmazonEKSClusterPolicy"
}
5. Create the Node Groups
The Node Groups will be responsible for running the pods in EKS:
# eks_node_group.tf
resource “aws_eks_node_group” “profiling_clients_nodes” {
 cluster_name = aws_eks_cluster.eks_cluster.name
 node_group_name = “profiling-clients-node-group”
 node_role_arn = aws_iam_role.eks_node_role.arn
 subnet_ids = aws_subnet.eks_subnet.*.id

scaling_config {
 desired_size = 3
 max_size = 5
 min_size = 1
 }

depends_on = [aws_eks_cluster.eks_cluster]
}

resource "aws_iam_role" "eks_node_role" {
 name = "eks-node-role"

assume_role_policy = jsonencode({
 Version = "2012–10–17"
 Statement = [{
 Action = "sts:AssumeRole"
 Effect = "Allow"
 Principal = {
 Service = "ec2.amazonaws.com"
 }
 }]
 })
}

resource "aws_iam_role_policy_attachment" "eks_worker_node_policy" {
 role = aws_iam_role.eks_node_role.name
 policy_arn = "arn:aws:iam::aws:policy/AmazonEKSWorkerNodePolicy"
}

resource "aws_iam_role_policy_attachment" "eks_cni_policy" {
 role = aws_iam_role.eks_node_role.name
 policy_arn = "arn:aws:iam::aws:policy/AmazonEKS_CNI_Policy"
}

resource "aws_iam_role_policy_attachment" "eks_registry_policy" {
 role = aws_iam_role.eks_node_role.name
 policy_arn = "arn:aws:iam::aws:policy/AmazonEC2ContainerRegistryReadOnly"
}
6. Configure Multi-Tenancy in Kubernetes
To support multi-tenancy, we'll use namespaces and roles specific to each tenant:
# kubernetes.tf
provider “kubernetes” {
 host = aws_eks_cluster.eks_cluster.endpoint
 token = data.aws_eks_cluster_auth.eks.token
 cluster_ca_certificate = base64decode(aws_eks_cluster.eks_cluster.certificate_authority.0.data)
}

resource "kubernetes_namespace" "tenant_ns" {
 count = 2
 metadata {
 name = "tenant-${count.index}"
 }
}

resource "kubernetes_role" "tenant_role" {
 count = 2
 metadata {
 name = "tenant-role-${count.index}"
 namespace = kubernetes_namespace.tenant_ns[count.index].metadata[0].name
 }

rule {
 api_groups = [""]
 resources = ["pods", "services", "configmaps", "secrets"]
 verbs = ["get", "list", "watch", "create", "delete"]
 }
}

resource "kubernetes_role_binding" "tenant_role_binding" {
 count = 2
 metadata {
 name = "tenant-role-binding-${count.index}"
 namespace = kubernetes_namespace.tenant_ns[count.index].metadata[0].name
 }

role_ref {
 api_group = "rbac.authorization.k8s.io"
 kind = "Role"
 name = kubernetes_role.tenant_role[count.index].metadata[0].name
 }

subject {
 kind = "User"
 name = "tenant-user-${count.index}"
 api_group = "rbac.authorization.k8s.io"
 }
}
7. Configure Customer Profiling
Let's create ConfigMaps to store each tenant's profiling information:
# profiling_config.tf
resource “kubernetes_config_map” “tenant_profiling” {
 count = 2
 metadata {
 name = “tenant-profiling-${count.index}”
 namespace = kubernetes_namespace.tenant_ns[count.index].metadata[0].name
 }
data = {
 "profiling" = <<EOF
{
 "client_id": "client-${count.index}",
 "profile_settings": {
 "feature_flag": true,
 "data_limit": "100GB"
 }
}
EOF
 }
}
8. Deploy the Profiling Pods
Finally, let's deploy the pods that will use the profiling information:
# profiling_pods.tf
resource “kubernetes_deployment” “tenant_profiling_pod” {
 count = 2
 metadata {
 name = “profiling-pod-${count.index}”
 namespace = kubernetes_namespace.tenant_ns[count.index].metadata[0].name
 }

spec {
 replicas = 1
 selector {
 match_labels = {
 app = "profiling-pod"
 }
 }

template {
 metadata {
 labels = {
 app = "profiling-pod"
 }
 }

spec {
 container {
 name = "profiling-container"
 image = "nginx" # Substitua pela imagem de sua aplicação de profiling

env {
 name = "PROFILE_SETTINGS"
 value_from {
 config_map_key_ref {
 name = kubernetes_config_map.tenant_profiling[count.index].metadata[0].name
 key = "profiling"
 }
 }
 }
 }
 }
 }
 }
}
9. Apply the Configuration
Now that the whole configuration is ready, we can apply it with Terraform:
terraform init
terraform apply
This tutorial sets up a basic infrastructure for customer profiling in a multi-tenant environment on Amazon EKS. Each tenant has its own namespace, role and profiling pod, with the settings defined in ConfigMaps.
See you in the next post! =)
Comments
Every comment is moderated before it appears here. Nothing is published automatically.
Loading…