 CARLOS DIEGO C. P.
Technical Post · Amazon Web Services
Implementing an Authorizer Architecture for Applications Delivered as SaaS (Software as a Service) on AWS
Here’s a technical tutorial on how to implement an Authorizer architecture for applications delivered as SaaS…
Keywords
In this post I'm sharing a technical tutorial on how to implement an Authorizer architecture for applications delivered as SaaS (Software as a Service) on AWS, taking three service levels into account: Gold, Silver and Bronze. This architecture lets you authorize users' access to different tenants according to their service level, providing compute resources and responsiveness suited to their needs.
Let's break the tutorial into several steps to make it easier to follow and implement.
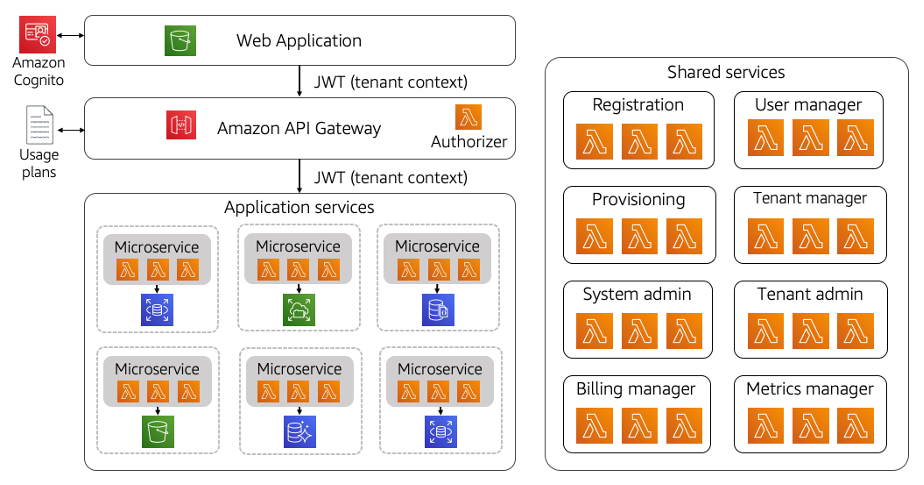
1. Defining the system structure:
Before you start implementing the Authorizer architecture, it's important to define the structure of the system. In this case, we'll have three service tiers: Gold, Silver and Bronze. Each tier will have its own compute resources and responsiveness. We'll also need an authentication mechanism to verify users' credentials and determine which tier they belong to.
2. Setting up user authentication:
To implement user authentication, we can use Amazon Cognito, which provides authentication, authorization and user management services. Follow these steps to set up user authentication:
2.1. Create a user pool in Amazon Cognito for your SaaS application. Define the authentication options, such as username/password sign-in or social sign-in.
2.2. Configure the authentication and customization flows to suit your needs. You can define custom attributes to store additional information about users, such as their service level.
2.3. At sign-up or later on, assign users a custom attribute representing their service level (for example, “tier” with the values “gold”, “silver” or “bronze”).
3. Implementing the Authorizer:
Now let's implement the Authorizer logic that determines the user's tier and authorizes access to the corresponding tenant. In this example, we'll use AWS Lambda to create an authorization function.
3.1. Create a new AWS Lambda function in the AWS console or using the AWS CLI. Be sure to pick the programming language you prefer.
3.2. Set the Lambda function's triggers so it fires when the user authenticates. This depends on the authentication service you're using. For example, if you're using Amazon Cognito, set the trigger to fire when a user successfully authenticates.
3.3. Inside the Lambda function, retrieve the authenticated user's information (for example, their username, ID or custom attributes) from the trigger events provided.
3.4. Based on the user's information, determine which tier they belong to. You can do this by checking the value of the custom attribute defined earlier (for example, “tier” being “gold”, “silver” or “bronze”).
3.5. Based on the user's tier, you can use AWS Identity and Access Management (IAM) to grant access permissions to specific resources, such as databases or server instances, associated with each tenant. Configure IAM policies to allow or deny access to resources based on the user's tier.
4. Implementing tenant segregation:
To ensure tenant segregation and provide each service tier with the right compute resources and responsiveness, you can use different server or database instances for each tenant. Follow these steps to implement tenant segregation:
4.1. Create separate server or database instances for each service tier. For example, you could have one server instance for Gold customers, another for Silver customers and another for Bronze customers.
4.2. When granting access permissions to resources through IAM policies, set appropriate permissions for each tier. For example, Gold customers might have full access to resources, while Silver customers have limited access and Bronze customers have minimal access.
4.3. When responding to user requests, check the authentication and authorization information to determine the user's tier. Based on the tier, route the request to the appropriate server or database instance.
5. Testing and monitoring:
After implementation, it's important to run thorough tests to make sure the Authorizer architecture works correctly. Be sure to test different scenarios, such as users in different tiers accessing the appropriate resources.
Also set up proper monitoring with services such as Amazon CloudWatch to track the performance and scalability of your SaaS application. This will help you spot any performance issues or bottlenecks in the architecture.
I hope this tutorial helps you implement an Authorizer architecture for your SaaS application on AWS with three service tiers. Remember to adapt the steps to your specific needs and to the technologies you're using. Good luck with your implementation!
Below I share the CloudFormation code to implement each of the steps above, including the Lambda functions in Python. Remember to adjust the resources and parameters to your specific needs.
Step 1: Defining the system structure
Resources:
  MySaaSSystem:
    Type: AWS::CloudFormation::Stack
    Properties:
      TemplateURL: path/to/your/template.yaml
      Parameters:
        - Tier: Gold
        - Tier: Silver
        - Tier: Bronze
Step 2: Setting up user authentication
Resources:
  UserPool:
    Type: AWS::Cognito::UserPool
    Properties:
      UserPoolName: MyUserPool
      Policies:
        PasswordPolicy:
          MinimumLength: 8
          RequireLowercase: true
          RequireUppercase: true
          RequireNumbers: true
          RequireSymbols: true
      UsernameAttributes:
        - email
      AutoVerifiedAttributes:
        - email
      Schema:
        - Name: tier
          AttributeDataType: String
          Mutable: true
UserPoolClient:
    Type: AWS::Cognito::UserPoolClient
    Properties:
      UserPoolId: !Ref UserPool
      ClientName: MyAppClient
Step 3: Implementing the Authorizer (Lambda)
Resources:
  AuthAuthorizer:
    Type: AWS::Lambda::Function
    Properties:
      FunctionName: AuthAuthorizer
      Runtime: python3.8
      Handler: index.lambda_handler
      Code:
        ZipFile: |
          import jsondef lambda_handler(event, context):
              # Recupere as informações do usuário autenticado a partir do evento de gatilho
              # Implemente a lógica para determinar o tier do usuário com base nas informações do usuário
              # Retorne uma política IAM adequada com base no tier do usuário
              if user_tier == "gold":
                  policy = {
                      "Version": "2012-10-17",
                      "Statement": [
                          {
                              "Effect": "Allow",
                              "Action": [
                                  "ec2:*",
                                  "rds:*"
                              ],
                              "Resource": "*"
                          }
                      ]
                  }
              elif user_tier == "silver":
                  policy = {
                      "Version": "2012-10-17",
                      "Statement": [
                          {
                              "Effect": "Allow",
                              "Action": [
                                  "ec2:Describe*"
                              ],
                              "Resource": "*"
                          }
                      ]
                  }
              elif user_tier == "bronze":
                  policy = {
                      "Version": "2012-10-17",
                      "Statement": [
                          {
                              "Effect": "Allow",
                              "Action": [
                                  "ec2:DescribeInstances"
                              ],
                              "Resource": "*"
                          }
                      ]
                  }
              else:
                  # Caso o tier não seja reconhecido, retorne uma política vazia ou uma política de negação
                  policy = {
                      "Version": "2012-10-17",
                      "Statement": [
                          {
                              "Effect": "Deny",
                              "Action": "*",
                              "Resource": "*"
                          }
                      ]
                  }
              return {
                  "principalId": "user",
                  "policyDocument": policy
              }
      Role: !GetAtt AuthAuthorizerRole.Arn
  AuthAuthorizerRole:
    Type: AWS::IAM::Role
    Properties:
      RoleName: AuthAuthorizerRole
      AssumeRolePolicyDocument:
        Version: 2012-10-17
        Statement:
          - Effect: Allow
            Principal:
              Service: lambda.amazonaws.com
            Action: sts:AssumeRole
      Policies:
        - PolicyName: AuthAuthorizerPolicy
          PolicyDocument:
            Version: 2012-10-17
            Statement:
              - Effect: Allow
                Action:
                  - cognito-idp:AdminGetUser
                  - cognito-idp:AdminUpdateUserAttributes
                Resource: "*"
Step 4: Implementing tenant segregation
Resources:
  GoldTierServer:
    Type: AWS::EC2::Instance
    Properties:
      # Configurações da instância GoldTierServer
SilverTierServer:
    Type: AWS::EC2::Instance
    Properties:
      # Configurações da instância SilverTierServer
  BronzeTierServer:
    Type: AWS::EC2::Instance
    Properties:
      # Configurações da instância BronzeTierServer
Step 5: Testing and monitoring
Resources:
  MyMonitoringDashboard:
    Type: AWS::CloudWatch::Dashboard
    Properties:
      DashboardName: MyMonitoringDashboard
      DashboardBody: >
        {
          "widgets": [
            {
              "type": "metric",
              "x": 0,
              "y": 0,
              "width": 12,
              "height": 6,
              "properties": {
                "view": "timeSeries",
                "stacked": false,
                "metrics": [
                  [ "AWS/EC2", "CPUUtilization", "InstanceId", "i-0123456789abcdef0", { "label": "GoldTierServer" } ],
                  [ "AWS/EC2", "CPUUtilization", "InstanceId", "i-0123456789abcdef1", { "label": "SilverTierServer" } ],
                  [ "AWS/EC2", "CPUUtilization", "InstanceId", "i-0123456789abcdef2", { "label": "BronzeTierServer" } ]
                ],
                "region": "us-east-1"
              }
            }
          ]
        }
Remember to replace the # Configurações comments with the right values for your server instances, such as instance type, AMI image, SSH keys and so on.
I hope these CloudFormation YAML examples and Python Lambda functions help you implement an Authorizer architecture for your SaaS application on AWS. Be sure to adjust the code as needed for your specific needs.
See you in the next post! =)
Comments
Every comment is moderated before it appears here. Nothing is published automatically.
Loading…