 CARLOS DIEGO C. P.
Technical Post · Amazon Web Services
Configuring AWS DMS for Oracle Database Replication
The data replication and migration problem
Keywords
The data replication and migration problem
Data replication and migration are essential tasks in many organizations that run Oracle databases. The need to move data from one database to another can arise for many reasons: a hardware upgrade, a move to the cloud, setting up a backup environment, or simply needing multiple copies of the data for analytics and reporting. These processes must be carried out with the utmost precision to make sure the data is consistent and complete, which is particularly challenging in large, complex databases such as Oracle.
Data migration can be disruptive to business operations, since it usually involves some degree of system downtime. To minimize the business impact, data replication has to happen quickly and efficiently. Another common problem is the need to ensure data integrity and consistency during the migration, which can be especially challenging when the data is constantly being updated in the source database.
Migrating data between Oracle databases also runs into challenges around version compatibility and the need to adjust data schemas. Each Oracle instance may have its own settings and customizations, which makes direct replication more complicated. Finally, data security is a critical concern, especially when data is being transferred between different environments, such as from an on-premises data center to the cloud.
Challenges in these operations
Replicating data between Oracle databases involves several technical challenges. First, the complex, customized structure of each database can make direct replication difficult, requiring careful mapping of tables and columns. In many cases, the data has to be transformed during replication to make it compatible with the target database. This requires deep knowledge of both databases' structures and meticulous planning.
Another significant challenge is ensuring data consistency during real-time replication. In high-transaction-volume environments, data is constantly being updated, and any replication lag can lead to inconsistencies. Making sure every change is captured and replicated correctly requires a robust monitoring and control system. System performance can also suffer during replication, which can hurt business operations.
Minimizing downtime is another critical challenge. Any interruption in data access can have a significant business impact. So the replication process has to run efficiently to keep downtime to a minimum. That includes setting up data replication without interrupting normal database operations, which can be particularly challenging in large, complex systems.
The solution offered by AWS DMS
AWS Database Migration Service (DMS) offers an efficient, reliable solution for replicating Oracle databases. AWS DMS simplifies setting up and running data migration and replication tasks, letting organizations move data quickly and securely between different environments. One of AWS DMS's main advantages is its ability to perform continuous, real-time data replication, so the target database is always up to date.
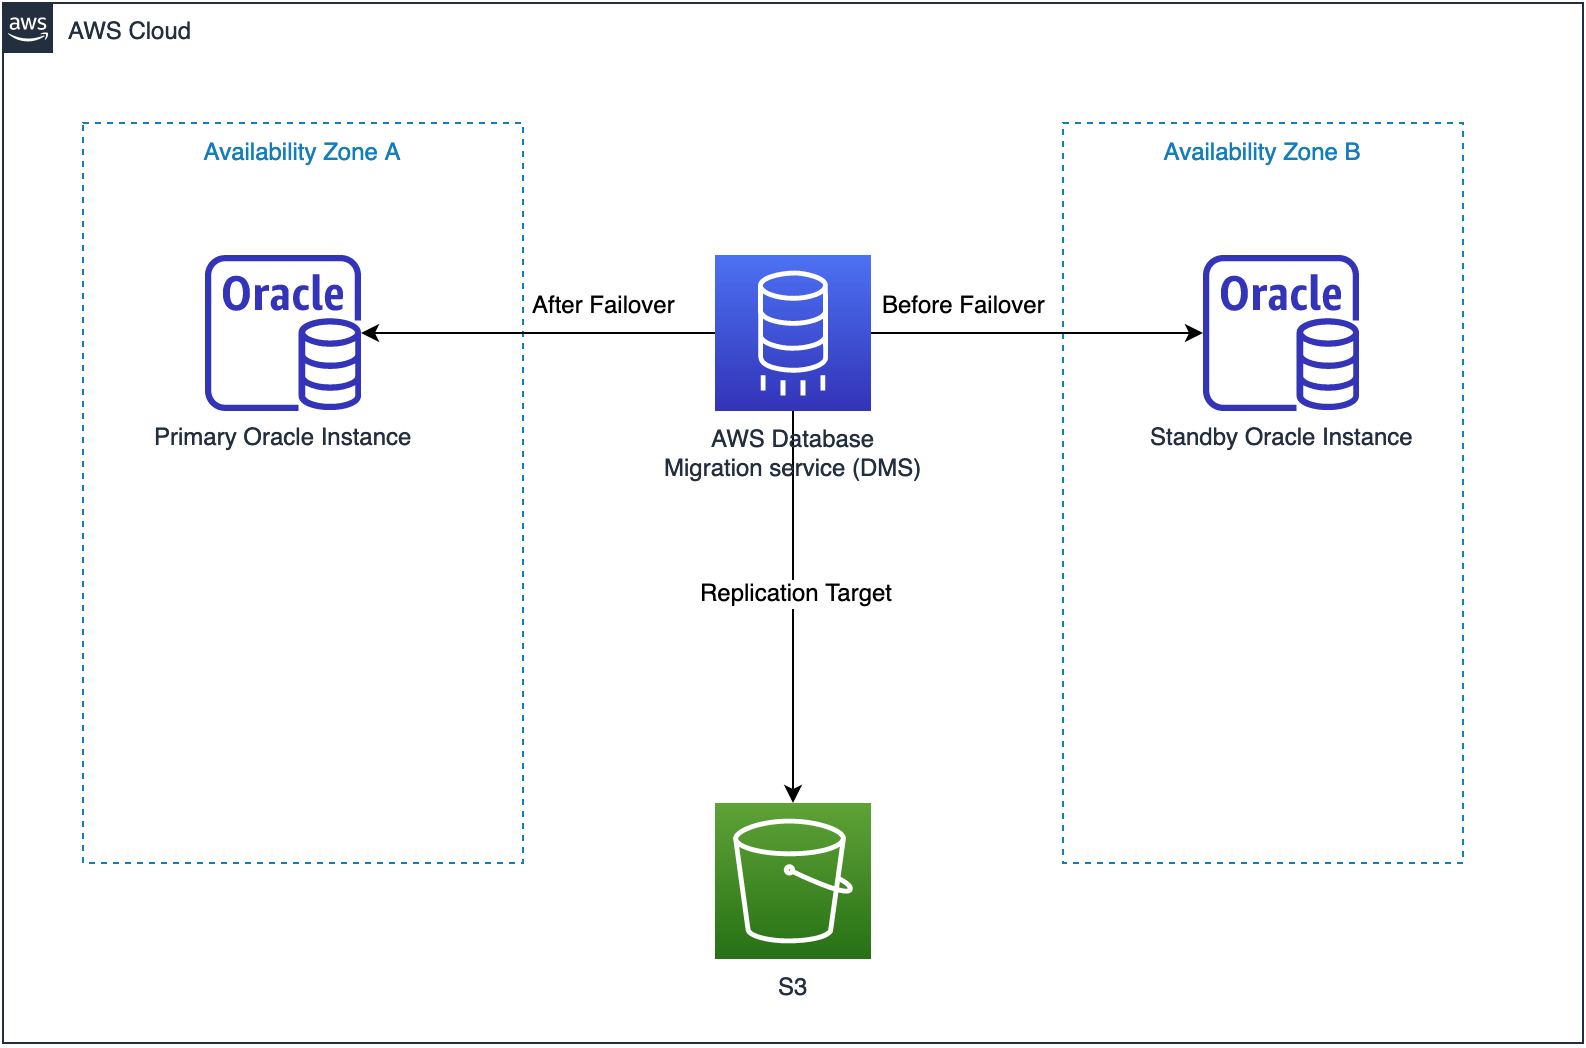
With AWS DMS, setting up data replication becomes significantly simpler. It supports a wide range of sources and targets, including Oracle, and is designed to minimize source database downtime during migration. This is particularly important for companies that need continuous, uninterrupted operations. AWS DMS also provides built-in tools for monitoring and tuning the replication process, helping you identify and fix problems quickly.
Another important benefit of AWS DMS is its scalability and flexibility. It can handle large data volumes and multiple database instances at once, which makes it a good fit for complex enterprise environments. The service also supports both homogeneous (Oracle to Oracle) and heterogeneous migrations, offering a comprehensive solution for different migration scenarios. Being able to automate much of the replication process also helps reduce human error and ensure data consistency.
Benefits of the solution
Using AWS DMS to replicate Oracle databases brings several significant benefits. First, ease of setup is a big advantage. AWS DMS simplifies the replication process, cutting the time and effort needed to get it started. This is especially useful for companies that need to roll out replication solutions quickly without compromising quality.
AWS DMS also ensures high availability and reliability during replication. The service includes automatic recovery and monitoring mechanisms, which means any problem that arises during the process can be quickly identified and fixed. This helps minimize the risk of failure and keeps replication running continuously and without interruption.
Another crucial benefit is minimal downtime. Real-time replication significantly reduces downtime, letting operations continue without significant interruptions. This is vital for companies that can't afford long periods of downtime due to data replication processes. AWS DMS's scalability also lets it handle large data volumes and multiple database instances at once, which is essential for growing companies.
How to implement AWS DMS to replicate Oracle databases
In this tutorial, we'll set up data replication between two Oracle database instances using AWS Database Migration Service (DMS). We'll use Terraform to automate the configuration of the required AWS resources.
Assumptions
Before you start, make sure you have:
- AWS and Oracle accounts: Access to AWS and Oracle accounts with the necessary permissions.
- Oracle instances: Two configured Oracle instances (one as the source and one as the target).
- VPC and Subnets: A VPC configured with subnets to connect the Oracle instances to AWS DMS.
- Tools: Terraform installed and configured in your local environment.
Step by Step
Step 1: Configure the VPC and Subnets
Make sure you have a VPC configured with the right subnets to host the AWS DMS resources and your Oracle instances.
provider "aws" {
  region = "us-west-2"
}

resource "aws_vpc" "main" {
  cidr_block = "10.0.0.0/16"
}

resource "aws_subnet" "subnet_1" {
  vpc_id            = aws_vpc.main.id
  cidr_block        = "10.0.1.0/24"
  availability_zone = "us-west-2a"
}

resource "aws_subnet" "subnet_2" {
  vpc_id            = aws_vpc.main.id
  cidr_block        = "10.0.2.0/24"
  availability_zone = "us-west-2b"
}
Step 2: Configure the Security Group
Create a security group to allow traffic between AWS DMS and the Oracle instances.
resource "aws_security_group" "dms_sg" {
  vpc_id = aws_vpc.main.id

  ingress {
    from_port   = 1521
    to_port     = 1521
    protocol    = "tcp"
    cidr_blocks = ["0.0.0.0/0"]
  }

  egress {
    from_port   = 0
    to_port     = 0
    protocol    = "-1"
    cidr_blocks = ["0.0.0.0/0"]
  }
}
Step 3: Configure the DMS Replication Instance
Create a DMS replication instance that will be used to move data between the Oracle databases.
resource "aws_dms_replication_instance" "example" {
  replication_instance_class = "dms.t2.medium"
  allocated_storage         = 50
  replication_instance_id   = "dms-example-instance"
  publicly_accessible       = true
  vpc_security_group_ids    = [aws_security_group.dms_sg.id]
  availability_zone         = "us-west-2a"
  replication_subnet_group_id = aws_dms_replication_subnet_group.example.id
}

resource "aws_dms_replication_subnet_group" "example" {
  replication_subnet_group_id = "example-dms-replication-subnet-group"
  replication_subnet_group_description = "DMS Replication Subnet Group"
  subnet_ids = [aws_subnet.subnet_1.id, aws_subnet.subnet_2.id]
}
Step 4: Configure the DMS Endpoints
Configure the source and target endpoints for the Oracle databases.
resource "aws_dms_source_endpoint" "oracle_source" {
  endpoint_id = "oracle-source-endpoint"
  endpoint_type = "source"
  engine_name = "oracle"
  username = "oracle_username"
  password = "oracle_password"
  server_name = "oracle-source-db-server"
  port = 1521
  database_name = "orcl"
}

resource "aws_dms_target_endpoint" "oracle_target" {
  endpoint_id = "oracle-target-endpoint"
  endpoint_type = "target"
  engine_name = "oracle"
  username = "oracle_username"
  password = "oracle_password"
  server_name = "oracle-target-db-server"
  port = 1521
  database_name = "orcl"
}
Step 5: Configure the DMS Replication Task
Configure a replication task that defines what gets migrated and how.
resource "aws_dms_replication_task" "example" {
  replication_task_id          = "example-task"
  source_endpoint_arn          = aws_dms_source_endpoint.oracle_source.arn
  target_endpoint_arn          = aws_dms_target_endpoint.oracle_target.arn
  migration_type               = "full-load-and-cdc"
  table_mappings               = file("table-mappings.json")
  replication_task_settings    = file("task-settings.json")
  replication_instance_arn     = aws_dms_replication_instance.example.replication_instance_arn
}
Step 6: Configuration Files (table-mappings.json and task-settings.json)
Create the table-mappings.json and task-settings.json files with the settings specific to your replication.
table-mappings.json
{
  "rules": [
    {
      "rule-type": "selection",
      "rule-id": "1",
      "rule-name": "1",
      "object-locator": {
        "schema-name": "%",
        "table-name": "%"
      },
      "rule-action": "include"
    }
  ]
}
task-settings.json
{
  "TargetMetadata": {
    "TargetSchema": "",
    "SupportLobs": true,
    "FullLobMode": false,
    "LobChunkSize": 64,
    "LimitedSizeLobMode": true,
    "LobMaxSize": 32,
    "InlineLobMaxSize": 0,
    "LoadMaxFileSize": 0,
    "ParallelLoadThreads": 0,
    "ParallelLoadBufferSize": 0,
    "BatchApplyEnabled": false,
    "TaskRecoveryTableEnabled": false
  },
  "FullLoadSettings": {
    "TargetTablePrepMode": "DROP_AND_CREATE",
    "CreatePkAfterFullLoad": false,
    "StopTaskCachedChangesApplied": false,
    "StopTaskCachedChangesNotApplied": false,
    "MaxFullLoadSubTasks": 8,
    "TransactionConsistencyTimeout": 600,
    "CommitRate": 10000
  },
  "Logging": {
    "EnableLogging": true
  },
  "ControlTablesSettings": {
    "ControlSchema": "",
    "HistoryTimeslotInMinutes": 5,
    "HistoryTableEnabled": true,
    "SuspendedTablesTableEnabled": true,
    "StatusTableEnabled": true
  },
  "StreamBufferSettings": {
    "StreamBufferCount": 3,
    "StreamBufferSizeInMB": 8,
    "CtrlStreamBufferSizeInMB": 5
  },
  "ChangeProcessingDdlHandlingPolicy": {
    "HandleSourceTableDropped": true,
    "HandleSourceTableTruncated": true,
    "HandleSourceTableAltered": true
  },
  "ErrorBehavior": {
    "DataErrorPolicy": "LOG_ERROR",
    "DataTruncationErrorPolicy": "LOG_ERROR",
    "DataErrorEscalationPolicy": "SUSPEND_TABLE",
    "DataErrorEscalationCount": 0,
    "TableErrorPolicy": "SUSPEND_TABLE",
    "TableErrorEscalationPolicy": "STOP_TASK",
    "TableErrorEscalationCount": 0,
    "RecoverableErrorCount": -1,
    "RecoverableErrorInterval": 5,
    "RecoverableErrorThrottling": true,
    "RecoverableErrorThrottlingMax": 1800,
    "RecoverableErrorThrottlingMin": 60,
    "RecoverableErrorThrottlingStep": 60
  },
  "FailTaskWhenCleanTaskResourceFailed": true,
  "FailTaskWhenStopTaskResourceFailed": true,
  "FullLoadIgnoreConflicts": true,
  "CommitRate": 10000,
  "MaxKBytesPerRead": 64,
  "MaxBatchInterval": 1,
  "MaxBatchSize": 1000,
  "MaxMessageSize": 1.5,
  "MaxTransactionSize": 10000
}
Step 7: Run Terraform
Once all the files are configured, run Terraform to provision the resources.
terraform init
terraform apply
By following this tutorial, you'll have successfully set up data replication between two Oracle database instances using AWS DMS and Terraform. This process automates the configuration needed to move data securely and efficiently, ensuring your business operations continue without significant interruption.
See you in the next post! =)
Comments
Every comment is moderated before it appears here. Nothing is published automatically.
Loading…